


Sharon has 21+ years of experience as a qualified Emergency Care Nurse registered with the Australian Health Practitioner Regulation Agency (APHRA) and 12+ years as a First Aid Trainer.
She takes pride in FirstAidPro making first aid training available, comprehensive and affordable to everybody.
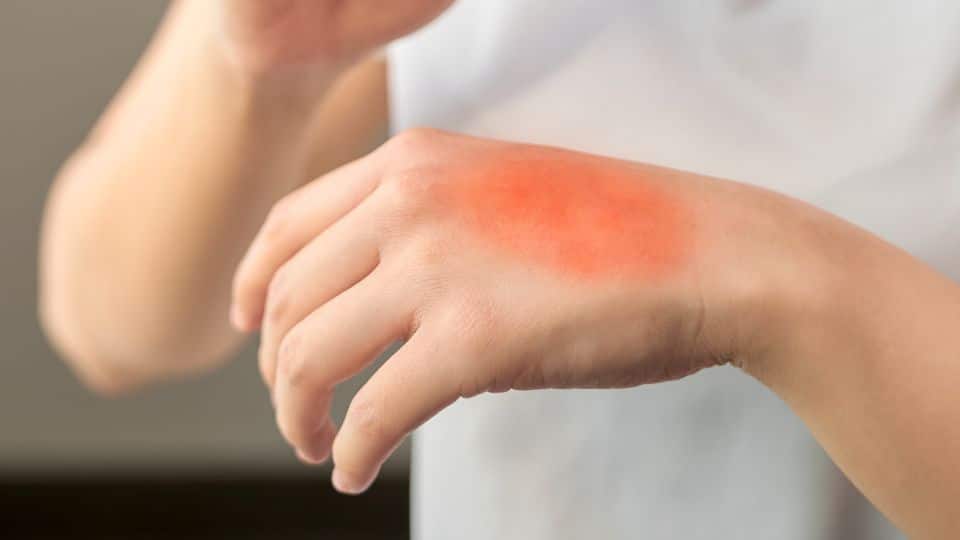
A burn is an injury to the skin or other organic tissue caused by heat, chemicals, electricity, friction or radiation. This guide explains how to treat burns and scalds correctly in Australia, with up-to-date first aid for burns steps, the cool water technique, kit essentials and when to seek medical help.
If you’d like hands-on training, consider enrolling in a nationally recognised first aid course with First Aid Pro today.
Key Takeaways
- Burns and scalds vary widely in severity — correct classification and first aid make a real difference.
- The universal first aid priority: stop the burning process, cool the burn with running water for at least 20 minutes, then cover the burn and seek help where needed.
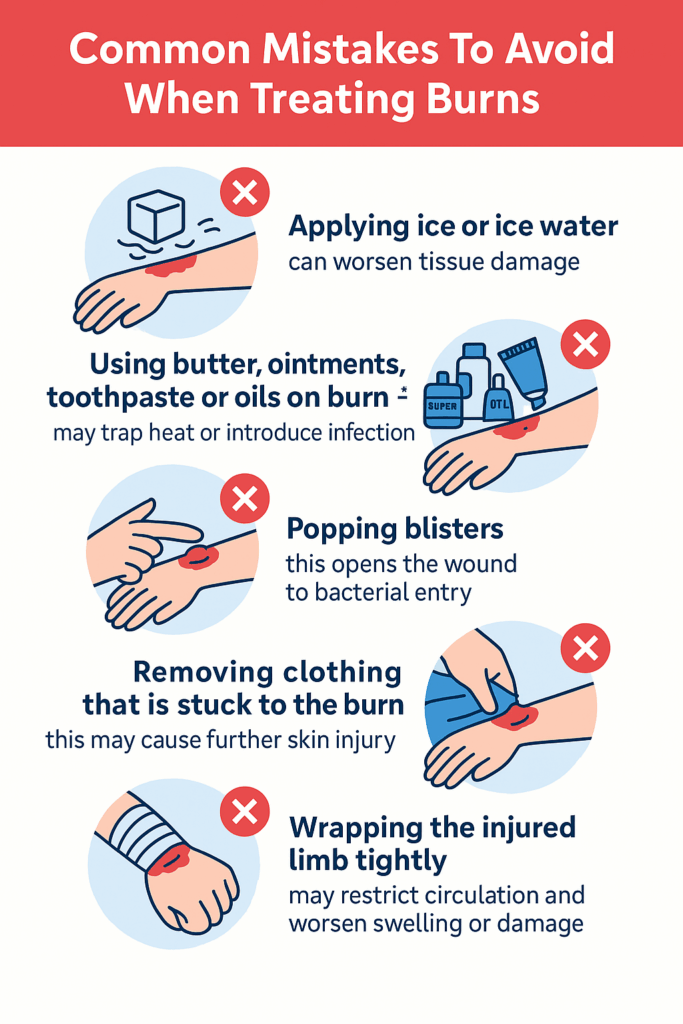
- Do not apply ice, butter or creams — they hinder healing and can cause further damage.
- A properly stocked first aid kit is essential — especially in homes and workplaces.
- When in doubt, treat it as an emergency: call 000 or seek medical help for major, chemical, electrical or deep burns.
Understanding Burn Types and Their Severity
What Are the Different Degrees of Burns?
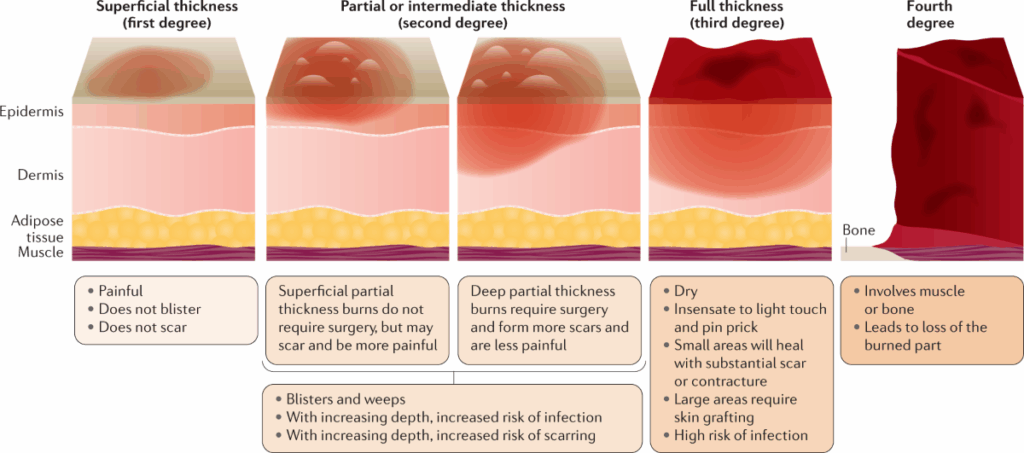
Burns are generally classified by how deeply the skin and underlying tissues are damaged. Here’s a simplified table:
Degree | Depth of Damage | Typical Appearance & Symptoms | Usual Healing Time |
First-degree burn | Top (epidermal) layer only | Red, painful, no blisters | Few days to ~1 week |
Second-degree burn (partial thickness) | First and second skin layers | Blisters, moist skin, very painful | 1–3 weeks, possibly more |
Third-degree burn (full thickness) | Deep into fat, muscle or bone | White, brown or black dry leathery skin, may be numb | Requires specialist care |
First-Degree Burns – Superficial Skin Damage
A first-degree burn affects only the outer layer of skin. Common causes include sunburn, brief contact with hot surfaces or minor scalds. The skin becomes red, tender and warm to touch; you typically won’t see blisters. These burns are painful but heal relatively quickly without scar, if treated well.
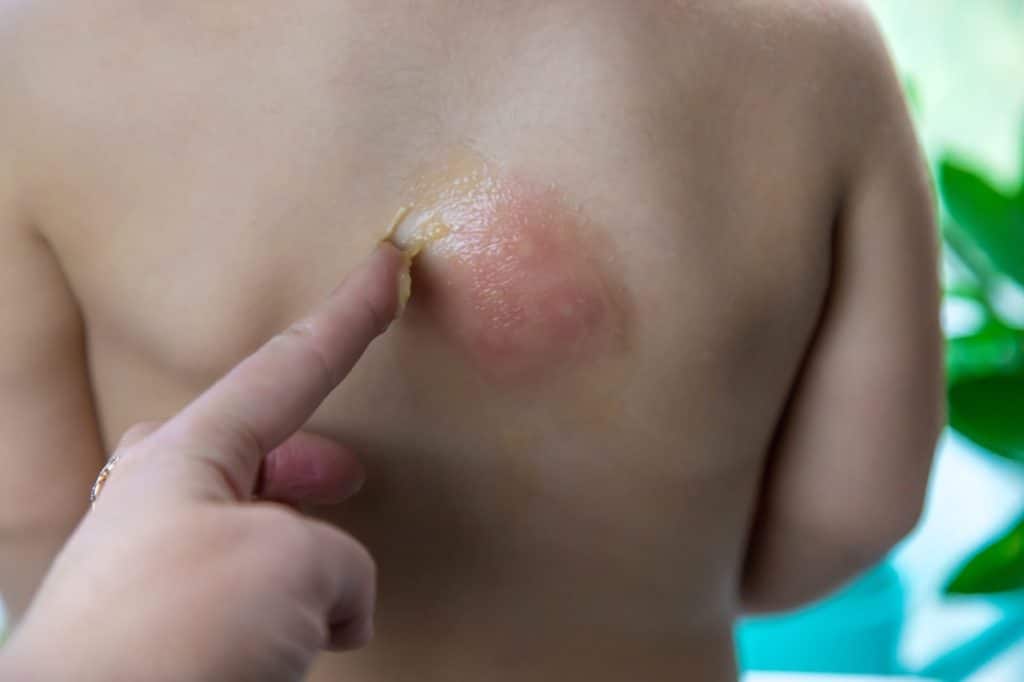
Second-Degree Burns – Partial Thickness Burns
Also often called a “partial thickness” burn, a second-degree burn extends into the second layer of skin. Blisters are common, the area is very painful and may appear mottled red or pale. These burns require attentive first aid and sometimes medical review to prevent infection or scarring.
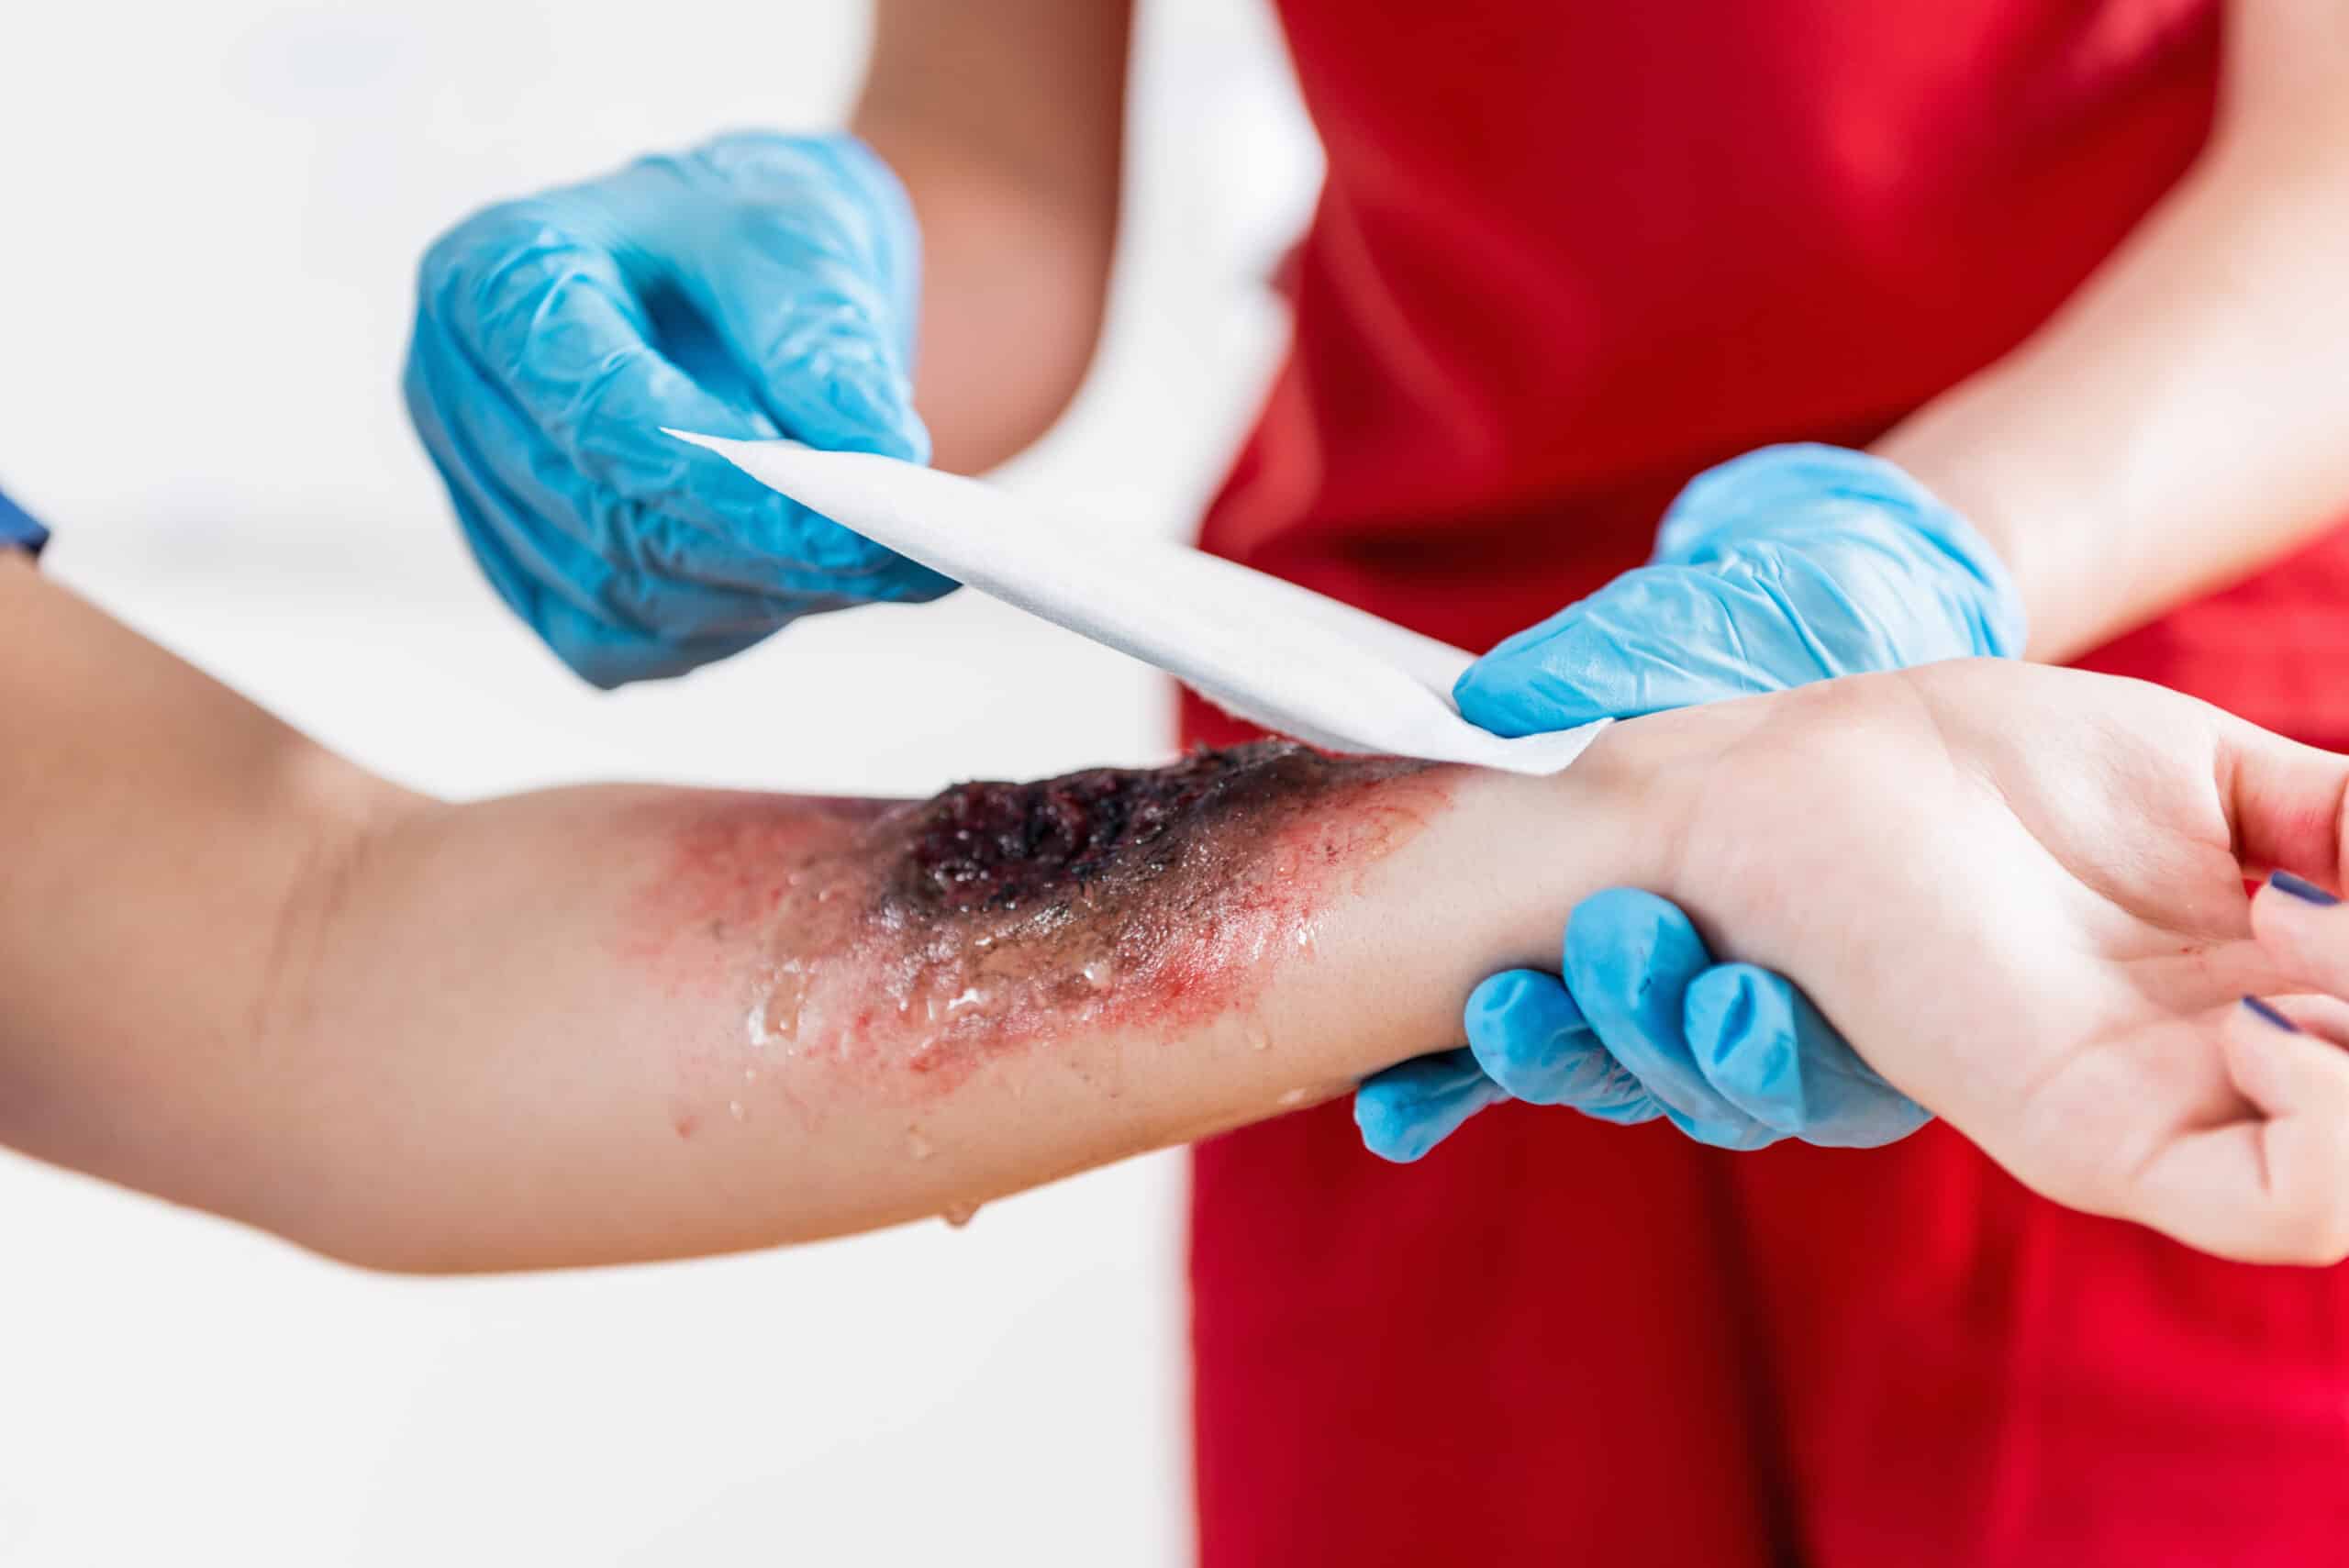
Third-Degree Burns – Full Thickness Burns
Third-degree burns are very serious. They destroy all layers of skin, and possibly underlying tissue. The skin may look charred, leathery, white or brown, and surprisingly the person may feel less pain (because nerve endings are destroyed). These are major burns, and you should treat them as a medical emergency immediately.
Step-by-Step Guide – How To Treat Burns Safely
Step 1 – Stop the Burning Process
First aid for burns must begin with safety. Remove the person from the source of the burn (flames, hot liquid, electricity or chemicals), if safe to do so. For example, turn off the stove, douse flames or switch off electricity. According to ANZCOR guidelines: “Ensure safety for rescuers, bystanders and the person. Send for an ambulance if significant burn or any doubt if this is a significant burn.”
Step 2 – Cool the Burn Using the Cool Water Technique
For the majority of burns (thermal, scalds) the primary first aid is to cool the burn with cool running water. Multiple Australian health authorities agree: use cool water (not ice) for at least 20 minutes.
Important pointers:
- Begin as soon as possible — the sooner the better. ANZCOR states cooling is helpful if started up to 3 hours after the burn.
- Use clean cool water, gently flowing over the affected area.
- Do not use ice or very cold water – this may worsen tissue damage.
- Remove jewellery, watches or constricting items from the area if they are not stuck to skin. Wet clothing soaked with hot liquid should be removed, unless it is adhered.
Step 3 – Protect and Cover the Burn
Once the burn has been cooled with running water for at least 20 minutes, the next step is to cover it. Use a loose, sterile non-stick dressing or clean plastic cling film laid lengthways (not wrapped around) the limb. This helps keep it clean and reduces pain and swelling.
Avoid using creams, ointments, butter, toothpaste, lotions or home remedies — they can trap heat or cause infection.
Step 4 – Manage Pain and Swelling
Elevate the burned limb if possible (to reduce swelling). For pain relief, standard over-the-counter analgesics such as paracetamol or ibuprofen may be used (unless contraindicated). Don’t forget that burns may cause fluid loss and risk of shock — keep the person warm (cover unburnt areas) while treating the burn.
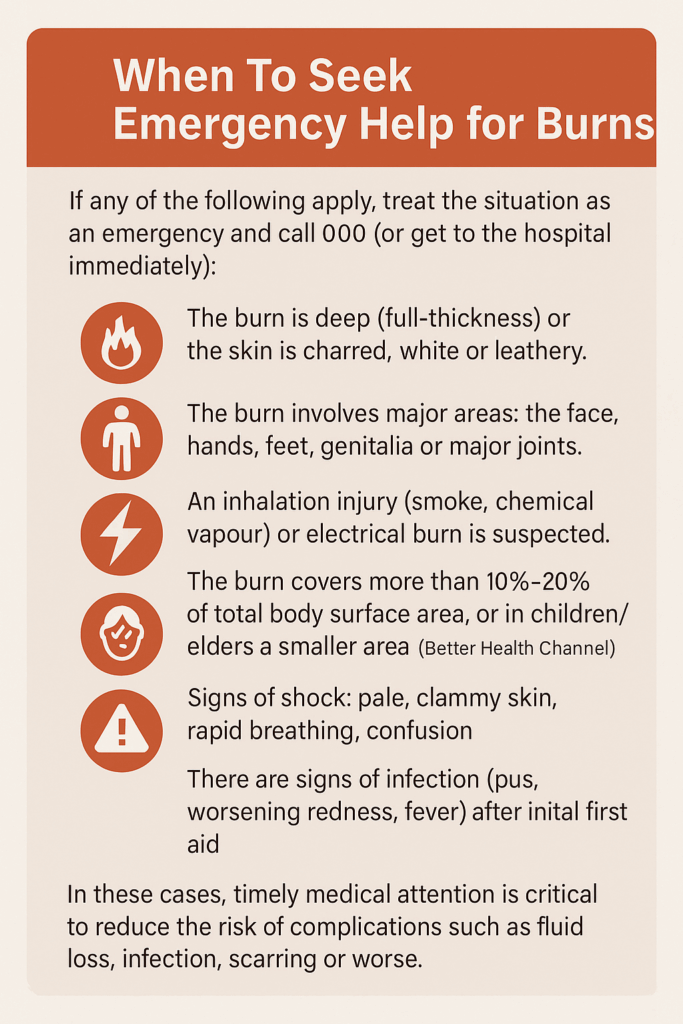
Step 5 – Seek Medical Attention When Necessary
You must seek emergency help for burns that are:
- Larger than a 20-cent coin in size (adult) or in a vulnerable individual (child/elderly).
- On the face, hands, feet, major joints or genitals.
- Caused by chemicals, electricity or inhalation injury (smoke).
- Full thickness (third-degree), or show signs of deep tissue damage (white/charred).
- Associated with difficulty breathing or other injuries.
If in doubt, call Triple Zero (000) and ask for an ambulance. This is consistent with Australian first aid guidelines.
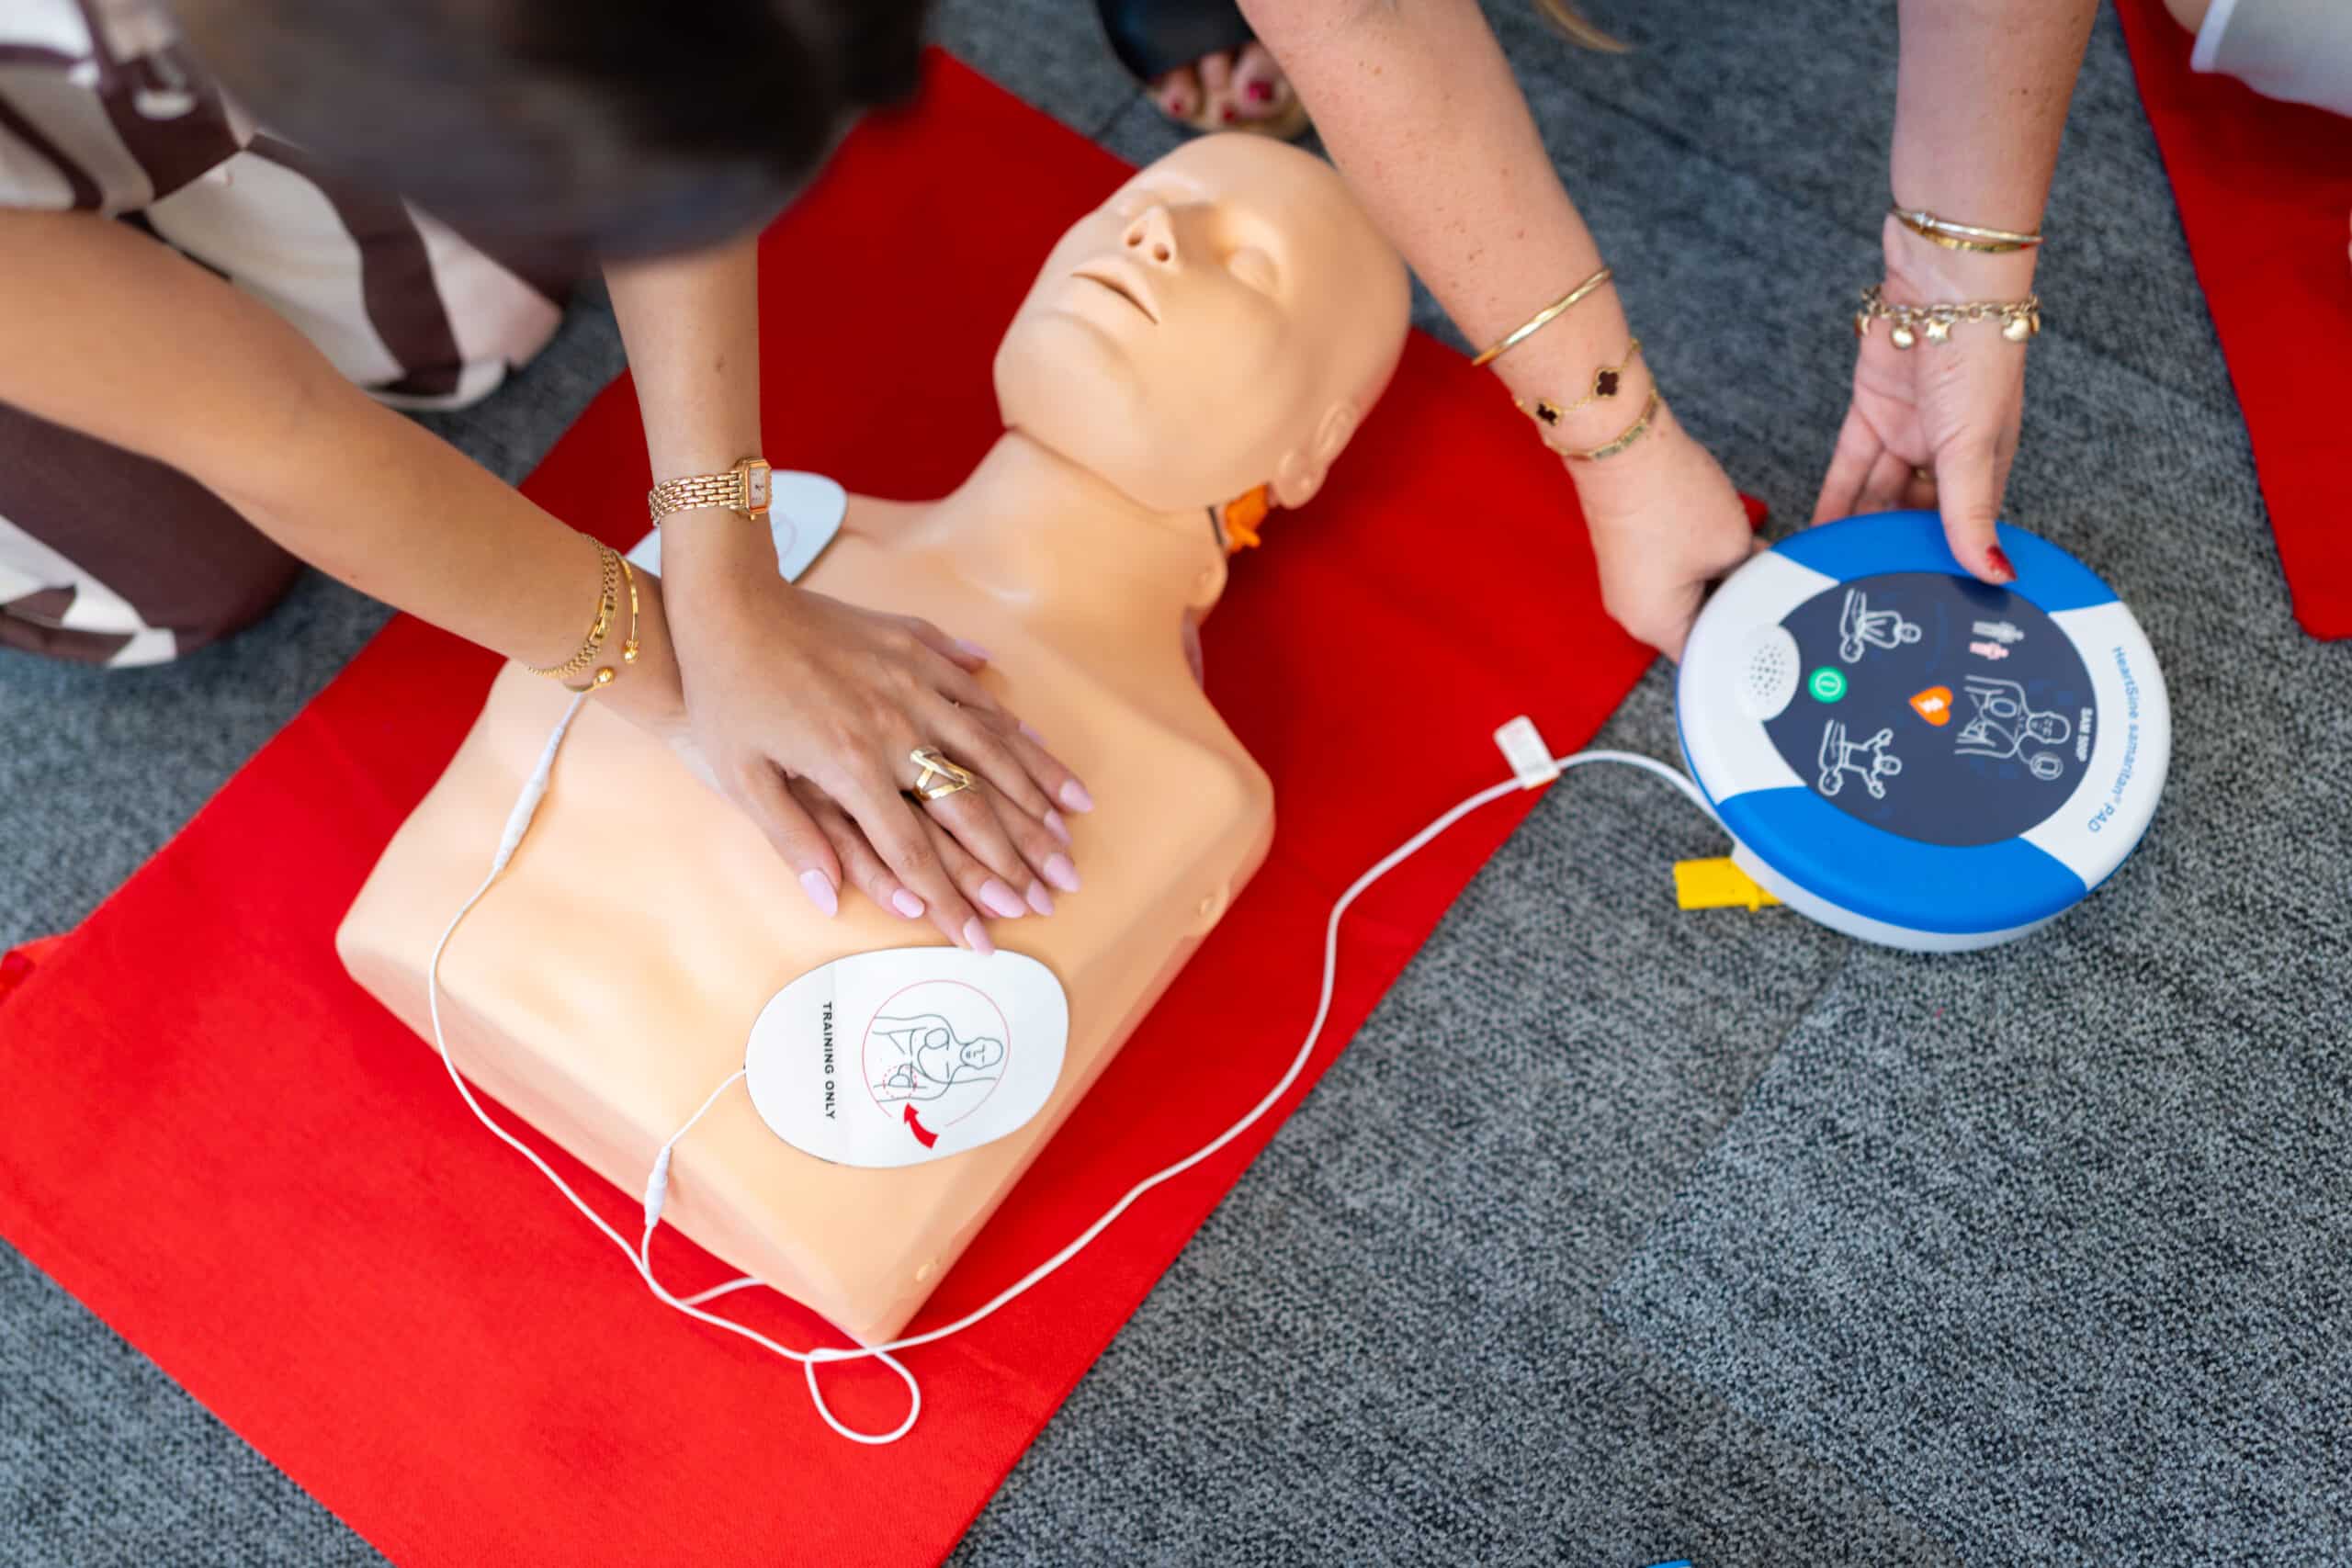
Be better prepared for common emergencies by watching FirstAidPro’s easy to follow instructional. (How to treat burns starts at minute 5):
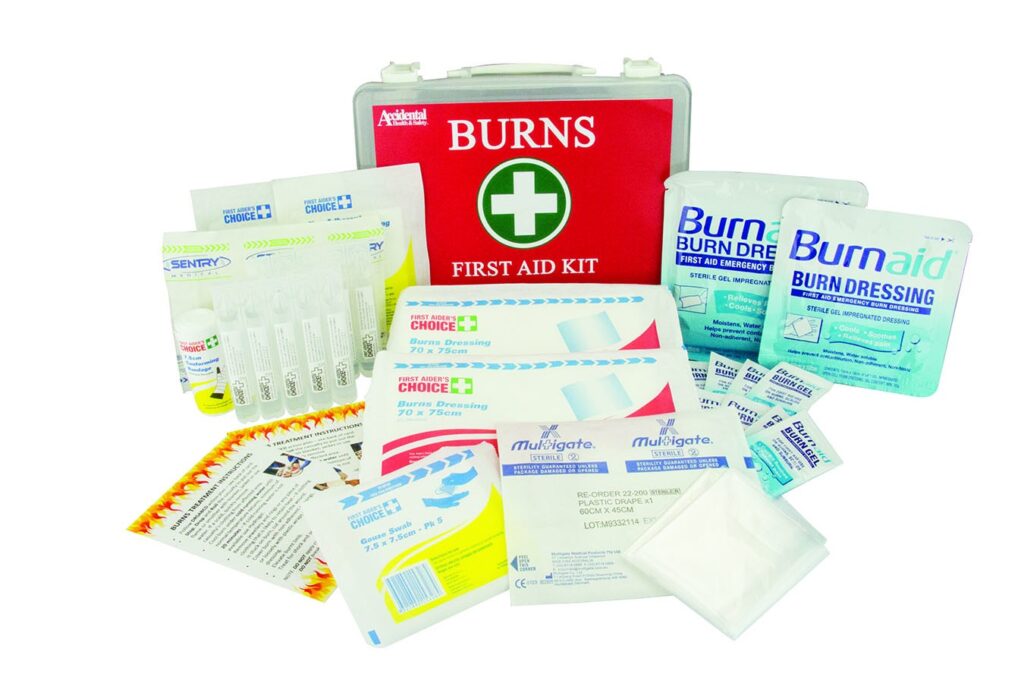
Essential Items in a First Aid Kit for Burns
A well-equipped first aid kit for burns (and scalds) will help you act quickly and appropriately. Here are essential items and why they matter:
Item | Purpose |
Sterile non-stick dressings or burn-specific dressings | To cover and protect the burn after cooling |
Plastic cling film (clean) | Acts as a temporary cover when no dressing available |
Cool running-water supply nearby / access | Enables the cool running water first aid step |
Clean scissors & tweezers | To carefully remove jewellery or non-stuck clothing around the burn |
Disposable gloves & protective gear | To prevent infection when providing first aid |
Pain relief (paracetamol/ibuprofen) | For analgesia while awaiting medical review |
Emergency contact information | For ambulance, local burn unit referral |
Maintaining a dedicated burns section in your workplace or home first aid kit ensures you’re prepared. If you want practical training on how to use this kit and apply burns first aid, enrol in a nationally recognised first aid course with First Aid Pro — your team will thank you.
Preventing Burns at Home and Work
Prevention is always better than treatment when it comes to burns and scalds. Use these practical strategies to reduce burn injuries in households and workplaces.
Home Burn Prevention Tips
Simple changes in the kitchen, bathroom and living areas can prevent most household burns and scalds.
- • Keep hot drinks and boiling water out of reach of children.
- • Turn pot handles inwards and keep hot liquids away from table edges.
- • Test bath water temperature — set water heater thermostats to below 50°C.
- • Use protective gear around hot surfaces (ovens, irons, heaters).
- • Install and maintain working smoke detectors; keep fire extinguishers accessible.
Workplace Burn Prevention Practices
Stronger controls are needed wherever staff work with hot liquids, steam, chemicals or electrical systems.
- • Ensure employees have PPE when dealing with hot liquids, chemicals or ignition sources.
- • Train staff regularly in burns first aid and general workplace first aid guidelines.
- • Keep first aid kits well stocked (including burns-specific items) and ensure emergency procedures are posted.
- • Conduct risk assessments for chemical, electrical and thermal burn hazards.
Burns First Aid – Knowledge Quiz
Select the best answer for each question, then click Check answers. You can Reset to try again.
What is the minimum time you should apply cool running water to a burn?
Which of the following should you not do when first-aiding a burn?
A burn caused by hot steam or boiling water is called a:
When should you call emergency services for a burn?
After cooling a burn with water, what is the next appropriate step?
Learn How to Treat Burns with Confidence
Understanding how to treat burns effectively can make the difference between a quick recovery and a life-threatening emergency. Whether you’re at home or at work, knowing the right first aid for burns—cooling with running water for at least 20 minutes, covering with a clean dressing, and seeking medical help when necessary—ensures that you can respond calmly and correctly when it matters most.
By staying prepared, maintaining a stocked first aid kit, and avoiding common mistakes like using ice or ointments, you can help minimise pain, prevent infection, and promote faster healing. Burns and scalds can happen in an instant, but with proper training, your actions can have a lasting positive impact.
To gain hands-on skills, professional guidance, and nationally recognised certification, enrol in a First Aid course with First Aid Pro today. You’ll learn how to treat burns and many other emergency situations with confidence—so you’re always ready to help when someone needs it most.
References
- Healthdirect Australia: Burns and Scalds – First Aid, Treatments, Causes.
- Australian and New Zealand Committee on Resuscitation (ANZCOR) Guideline 9.1.3 – First Aid for Burns.
- Better Health Channel Victoria: Burns and Scalds — immediate first aid and classification.
- RACGP: Thermal Burns — Assessment and Acute Management in General Practice. (racgp.org.au)
Frequently Asked Questions
You should run cool (not cold) water over the burn for at least 20 minutes as soon as possible after the burn. This helps stop further tissue damage and reduces pain.
No. Ice or very cold water can cause further injury and impair circulation. Use cool running water instead and avoid ice completely.
Do not pop the blisters. Cover them with a sterile, non-stick dressing after cooling, and monitor for infection. Seek medical advice if the blister is large, deep or involves critical areas.
Essential items include sterile non-stick dressings, clean plastic cling film, gloves, scissors, analgesics, and immediate access to running water. These help you deliver proper first aid for burns and scalds.
You should seek medical attention if the burn is large (exceeding a 20-cent piece in adult), deep, affects the face, hands, feet, genitals or a major joint; or is caused by chemicals, electricity or stores-mapped smoke/inhalation. Also if signs of infection appear.